Showing posts with label text. Show all posts

September 17, 2007

Text and Balloons: 6 Advanced Techniques

Now that you know all the rules about text and dialogue balloons, I am going to tell you how to break them.

Janet and Alice (Brad's secretary, and Janet's alleged lover) will demonstrate.

1. Overlapping Balloons
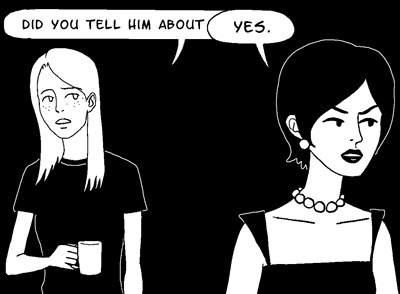
This is a common and effective way to show characters interrupting each other.

If you don't want it to look like your characters are talking over one another, you need to keep your balloons separate. No exceptions. If you need more room, draw your panels bigger.

2. Tiny Text

Abruptly switching to a smaller font size for your character's speech can make a powerful statement. How your readers "hear" the dialogue will vary depending on your character's expression and body language.
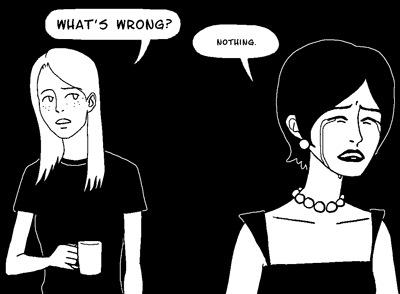
tinytext2

But if you use this technique too often, or inconsistently, it loses all of its power. So be careful.

If you want to shake things up a little bit, you could also use:

3. Huge Text
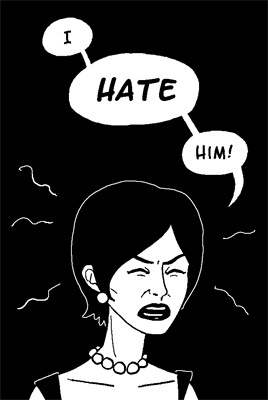
bigtext

This should be pretty self-explanatory.

4. Huge Balloons with Minimal Text

hugeballoon1

This is a good technique to bust out in uncomfortable moments. The visual weight of all the extra white space indicates an extra emotional weight behind the words. Like the previous techniques, it also affects how the reader "hears" the dialogue. The empty space surrounding the words is interpreted as empty time passing by— as if the words were bracketed by ellipses. "...Nothing. ..."

Because huge balloons are such attention-grabbers, you should avoid using them in combination with any of the other rule-breaking techniques. Also avoid pairing them with dramatic camera angles, exquisitely tortured facial expressions, or extended monologues.
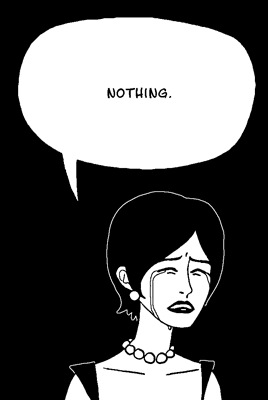
hugeballoon2

Like that. That's too much. Now it just looks silly.

If being silly was your intention all along, though, feel free to use and abuse your huge, empty balloons however you like.

5. Huge Balloons with Maximal Text
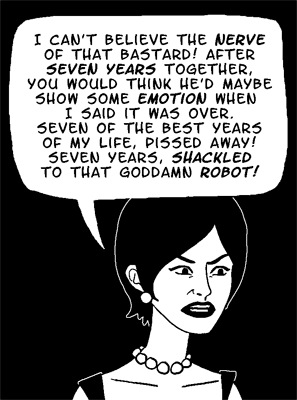
Got a character launching into a furious diatribe? Want to play it for laughs? Fill up 50% or more of the panel with a single balloon full of their incoherent ranting. You can also emphasize random words for extra hilarity. Bonus points if characters in the background are being physically pushed out of the panel by the enormous balloon.

6. Packed Full of Balloons

talkingheads1

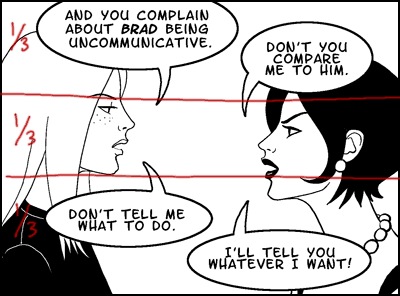
A balloon-heavy panel accomplishes two things: (1) it lets your characters' dialogue take center stage, and (2) it makes the reader feel slightly claustrophobic. Very useful for dramatizing intense arguments. You have to be careful not to let the art compete with the balloons, though. I used a white background for this panel to reduce the overall contrast in the image, and also made the outlines around the balloons slightly thicker than I normally do, so they would have more visual weight.

Just how balloon-heavy is balloon-heavy?
talkingheads4

Roughly two thirds of the entire panel is taken up by the balloons. The open area is centered around the most important part of the artwork, Alice and Janet's faces, so we can use their expressions to gauge how we should read their dialogue. Efficient.

The standard, non-rule-breaking way to do this scene would be to extend the panel height and let the balloons have their own space:

talkingheads3

This is certainly an acceptable panel layout, and because the balloons aren't having to compete for the reader's attention anymore, it lets you get away with bolder stylistic choices in the artwork. But it also forces you to draw everything smaller so you can fit both the characters and the balloons inside the borders, and this reduces the emotional impact of the panel. So I don't think it's the best choice for a dramatic exchange of words.

Of course, if you have panel after panel of nothing but tiny talking heads squished between dialogue balloons, you will wear out your readers.

Moral of the story: Rule-breaking techniques are your aces up the sleeve, so deploy them judiciously. Keep them behind your cuff until you're good and ready.

That's all for today!
next2

August 12, 2007

Text Triage Unit no. 2: The Illustrated Safety Manual

Yesterday someone mentioned that seeing a direct visual comparison of good and bad comic text would probably be more helpful to a bunch of artists than reading a page and a half of bitching about it. So for all of you visual learners out there, here's a quick illustrated guide to How Not to Screw Up Your Comic's Text.

Brad and Janet Noir, our unhappy couple from last time, will demonstrate.

1. Don't make your text too small.


2. Don't use an inappropriate font.


3. Don't condense your linespacing or letterspacing.


4. Don't put too much text in a single balloon.


5. Don't treat your balloons as if they were shrink-wrap for the text.


6. Don't carve your balloon into a jigsaw around the text, either.


7. Don't break up your text in unnatural ways.


8. And lastly, don't leave your text aligned to the left.


Hopefully why you shouldn't do any of these things is self-evident.

Just in case it's not, though, I'll explain: it looks like pure hell, and it makes it harder for me to enjoy reading your comic.

And I really, really want to enjoy reading your comic.


August 10, 2007

Text Triage Unit

I'm going to talk about text-related (not writing-related; that will come much later) problems first, because they're incredibly common, and also simple to fix.

There is one overriding rule when it comes to text, and it is this: if I can't read your text, I'm not going to read your comic.

So don't make your text too small for me to read it without squinting. Don't put too much text in a single balloon. Don't shrink the space between lines so you can cram more text into each balloon. Don't draw your balloons right up against the edge of the letters.

And for the love of god, don't do this.

Text should be big, clear, cut into small chunks for easy digestion, and have plenty of breathing space both between lines and around the edges. Like this. See how easy that is to read?

A Word About Fonts

Arial, Comic Sans, Times New Roman. DON'T USE THESE. In fact, don't use any font that came preinstalled on your computer. Why? Because they're ugly. They're also hard to read. They were never meant to be used in comics. They look amateurish. But mostly, they're just ugly.

There are a variety of free fonts specifically designed for use in comics, readily available from sites like Blambot. Pick a good one from their list-- NOT "Anime Ace", that one looks like crap too-- and use that instead.

A Word About Linespacing

If you letter your comics in MSPaint, then close your browser window right now and walk away. Your comic cannot be saved. It is DOA.

If you letter your comics in a proper image editor, though, you probably have the ability to tweak something called "linespacing."

This is how you do it in Adobe Photoshop (although the same technique applies for Illustrator):

Once you've got your text banged out, hit Ctrl + T to bring up the Character palette. The little icon with two A's on top of each other stands for linespacing.


Most of the time the (Auto) setting is good enough, but for maximum readability you may want to dick around with it. I prefer to err on the side of too much space between lines rather than too little, so I usually set linespacing to be a size bigger than my actual font size. In this case, my font is 18 point, so my spacing would be 24.


That looks better. But remember, not all fonts need to have their linespacing screwed around with. Use this technique sparingly, and use it for good, not evil. NEVER EVER use it to cram the lines closer together so you can pack more dialogue in.


That's all for today. Next up: balloons.